Recommended System: Anthbot US
Wire-free centimeter-level RTK satellite navigation, dual cutting discs, and intelligent slope climbing up to 45% grade for residential turf.
Affiliate disclosure: We may earn a commission from partner links (for example Anthbot) at no extra cost to you. Editorial opinions stay independent. Read our affiliate disclosure where published.
Why mower blade condition changes the lawn
A rotary mower does not make one slow knife cut. Its blade moves rapidly through the grass under the deck. When the cutting edge is sharp and the deck is stable, leaf tips are sliced cleanly. When the edge is rounded or damaged, the blade tears and crushes. The lawn can develop pale, frayed tips that turn brown across the entire surface even though the roots have adequate moisture.
That ragged injury has a practical cost. Torn leaves lose more water through damaged tissue and can remain visibly stressed. The mower may need more passes, while vibration from imbalance loads bearings and fasteners. Sharpening is therefore not cosmetic maintenance; it supports cut quality, predictable performance, and the machine’s mechanical health.
Blade inspection also catches impact damage. Hitting a stone, root, curb, metal stake, or hidden object can bend a blade, distort the mounting area, or damage the crankshaft and deck. If a new vibration begins after an impact, stop immediately. Do not keep mowing to see whether it settles down.
Dull vs. bent vs. cracked: what to look for
| Condition | What you may see | Normal decision |
|---|---|---|
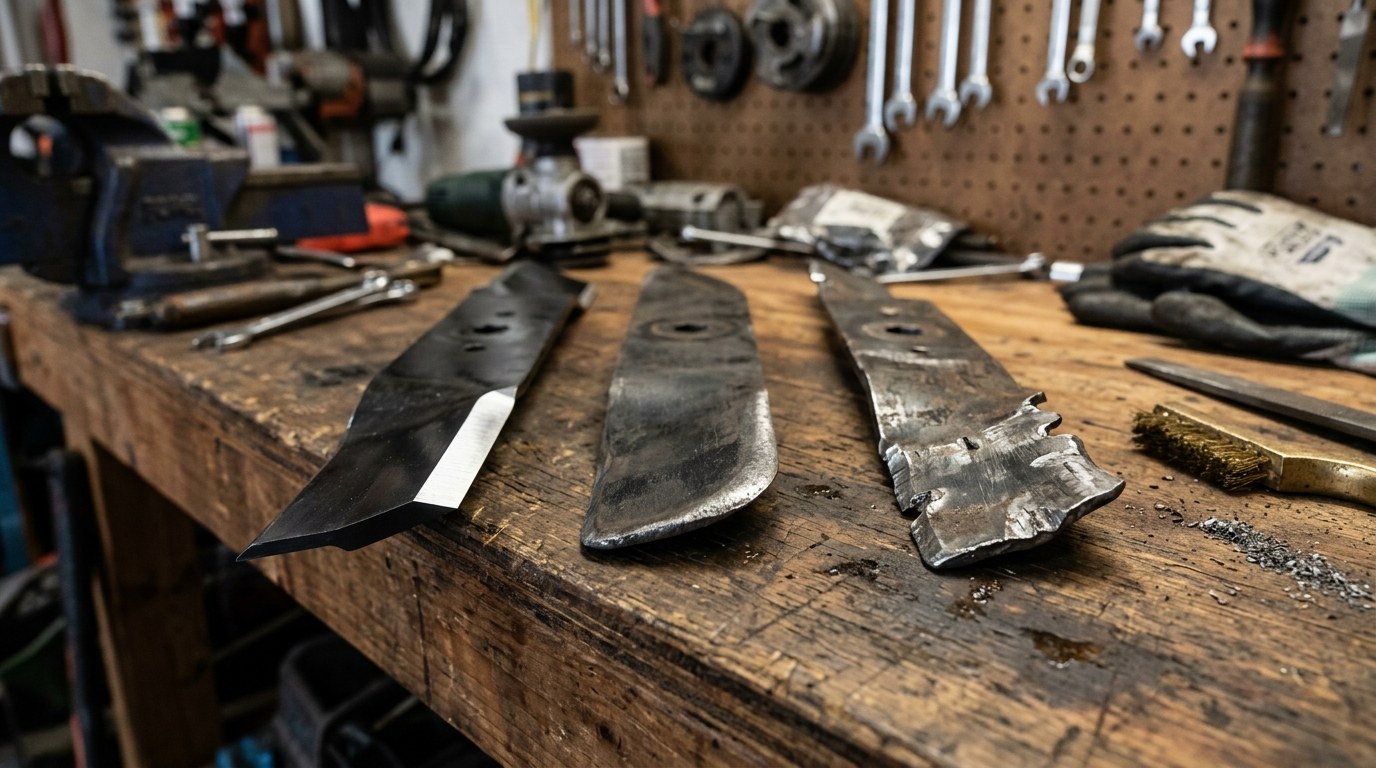
| Dull edge | Rounded cutting edge, grass tips look shredded, no structural damage | Sharpen and balance if sufficient material remains |
| Small nick | Localized notch from light debris | May sharpen out evenly if the blade remains safe and balanceable |
| Bent blade | Uneven cutting plane, scalped arcs, visible twist, new vibration | Replace; do not try to hammer it straight |
| Crack | Line or split near edge, lift wing, or mounting area | Replace immediately |
| Severe thinning or erosion | Lift wing or trailing edge worn noticeably thin | Replace because structural margin is reduced |
| Cannot balance | One side repeatedly drops after careful sharpening | Replace rather than remove excessive material |
| Wrong geometry | Incorrect length, hole pattern, offset, lift, or interference | Use the exact approved replacement |
Dullness is easiest to confirm at the lawn. Walk behind the mower after a normal dry cut and look closely at multiple blades of grass. A clean edge looks like a neat clipped end. Numerous white threads and torn tips across the pass indicate the mower blade needs attention. A few damaged leaves near a gravel edge may simply reflect debris, so inspect several areas.
A bend can be subtle. With the machine fully disabled and secured according to its manual, compare each tip to a fixed reference on the deck as the blade is rotated carefully by hand. A changing distance can indicate a bent blade or a larger mechanical issue. This check should never be performed with energy connected.
Lawn mower blade wear: visual inspection guide
How often should a mower blade be sharpened?
There is no reliable date that fits every lawn. Blade wear depends on mowing hours, grass density, soil and sand, sticks, exposed roots, impacts, and whether the operator mows when conditions are wet. A small clean lawn may keep a good edge for many sessions. A sandy property or rough renovation area can dull a blade quickly.
Use an inspection interval rather than waiting for the lawn to look bad. Check cut tips every few mows and inspect the physical blade at the service interval in the manual. Many homeowners find that at least one sharpening during the main growing season plus an end-of-season inspection is a useful starting habit, but visible wear should override the calendar.
New blades should also be checked. Replacement parts normally arrive with the manufacturer’s intended edge, which may not feel razor sharp. A mower blade does not need a knife-like edge; an extremely thin edge can roll or nick quickly. Do not “improve” a new part unless the manufacturer directs it.
When replacement is safer than sharpening
Replacement is the right answer when sharpening cannot restore the blade without changing its intended strength or shape. Cracks are automatic rejection. So are bends and major twists. Heating, welding, or hammering a blade can alter the metal and create a failure risk. Deep damage near the mounting hole or lift wing is not a home repair.
Look at the trailing lift area, not only the cutting edge. Abrasive air and debris can erode the wing until it becomes thin or develops a notch. Because that section helps move air and clippings, wear can also reduce bagging and mulching performance. If the blade silhouette no longer resembles a sound replacement, stop removing material.
Balance is another limit. Sharpening should remove comparable material from both ends while preserving the original angle. If one side remains heavy after the edge is restored, grinding away large amounts merely to make it level can shorten or weaken the blade. A correctly specified replacement is inexpensive compared with deck, spindle, engine, or injury risk.
A safe inspection and service process
- Record the model and blade orientation. Obtain the correct manual and part number. Photograph the installed blade before removal if the manual permits.
- Disable every energy source. A released control is not enough. Remove the battery/key or disconnect ignition exactly as directed.
- Position the mower safely. Follow the approved tipping direction for fuel equipment so oil or fuel does not enter the wrong area. Support the machine; never rely on hands.
- Block the blade with the correct method. Use a purpose-made holder or the manual’s approach. Do not grip a sharp edge while loosening hardware.
- Inspect the blade and mounting parts. Clean enough debris to reveal cracks, bends, erosion, elongation, and damaged hardware.
- Sharpen or replace. Preserve the specified bevel. Avoid overheating the metal. Balance a sharpened blade with an appropriate balancer.
- Reinstall in the correct orientation. Use approved hardware and the torque value in the manual. A blade installed upside down will not cut properly.
- Clear the work area before reconnecting power. Rotate by hand only while disabled to check clearance. Reconnect, start from a safe position, and stop immediately if vibration is abnormal.
How to select the right replacement blade
Match the mower model, deck, length, center hole, outer holes, offset, thickness, and lift design. A blade that physically bolts on is not necessarily compatible. Too much length can strike the deck; incorrect offset can change cutting height or clearance; the wrong lift can overload the system or perform badly with the discharge configuration.
Mulching blades, high-lift bagging blades, and standard combination blades shape airflow differently. Use only a style approved for the machine and the intended deck configuration. Higher lift is not automatically better, especially in dusty conditions or with limited power. If a catalog has conflicting fitment information, confirm through the mower manufacturer or an authorized parts source.
Replace damaged mounting hardware with specified parts rather than generic substitutes. Washers may have a particular cup, shoulder, or orientation. Torque matters: too loose can allow movement, while overtightening can damage threads or make later service unsafe. Guessing with a long wrench is not torque control.
What the lawn should show after service
Test on a small, clear, dry area at the normal height. The mower should sound and feel consistent, without new vibration. Grass tips should appear cleaner after a day or two, although old frayed tissue remains until it grows out and is cut away. The mower should not leave an unexplained low stripe or repeated arc.
If vibration remains with a new correct blade, stop. The problem may involve the adapter, spindle, deck, motor shaft, crankshaft, or accumulated debris. Do not keep swapping blades around a damaged mounting system. A qualified technician can check runout and structural parts.
Store a spare correct blade only if you will keep it dry, labeled, and protected from damage. Rotating a serviced spare can reduce downtime, but each installation still requires full inspection and correct torque. Continue with the focused guide on when to replace mower blades, review summer mowing height, and see the tools hub for safe maintenance gear.
Sources and review notes
- University of Minnesota Extension: Mowers and mowing safety — blade sharpness, cut quality, mower types, and safety-device guidance.
- Always pair general blade guidance with the owner’s manual for the exact mower model.
Cons / limitations
Product-specific limitations for this job — not a generic “UI changes weekly” list:
- Grinding past the sail: Over-sharpening thins the wing until it cracks. There is a scrap point even if the edge is pretty.
- Mixing mulching and standard blades: The wrong profile in a mulch deck leaves trails. Match the deck’s intended blade.
- Service with the battery in: Skipping lockout is how shops see fingertip injuries. The limitation is the procedure, not the steel.
Desk metrics (11 September 2026)
Desk method and documented ranges. We did not invent a Foxy Gardens test plot, yield, or timed field trial.
- USDA zone: Gritty soils in some USDA 8–9 yards wear edges faster than a USDA 5 shaded fescue lot. Desk climate/soil texture note, not a wear bench.
- Soil pH: 6.0–7.0 pH for turf health after a clean cut; 11 min, no metallurgy-pH story.
- Fertilizer dose: 0 lb N in the blade shop. If the lawn is fed the same week, 0.7 lb N per 1,000 sq ft on the label and a sharp blade so you do not shred the flush.
- Desk duration: 18 min structured re-read of public USDA zone guidance, a soil pH kit procedure, and the fertilizer label math above.
Always disconnect main power sources—remove battery packs or unplug cords—before inspecting mower blades, clearing aeration tines, or handling sharp garden equipment. Keep hydroponic nutrient concentrates stored securely.
Practical guides curated by horticultural practitioners and yard care enthusiasts. Field-tested methods, verifiable steps, and zero automated fluff.
Frequently asked questions
Should I sharpen or replace a mower blade?
Sharpen a sound dull blade. Replace bends, cracks, deep damage, severe thinning, damaged mounts, or persistent imbalance.
How often should I inspect the blade?
Inspect cut tips every few mows and the physical blade at the manual’s interval and after any impact.